
There are several ways
that can be taken to Mikrotik connect to the Internet. These methods depend on
the modem or the devices used to connect to the Internet.
In general way Mikrotik connect to the Internet is as
follows:
1. Make sure the first source of Internet connection.
Whether from the ADSL modem or from a USB modem.
2. If the source of a direct Internet connection without
first modem settings, such as connection of modem or 3G Router, which
does not need additional settings on the Mikrotik then go to next step.
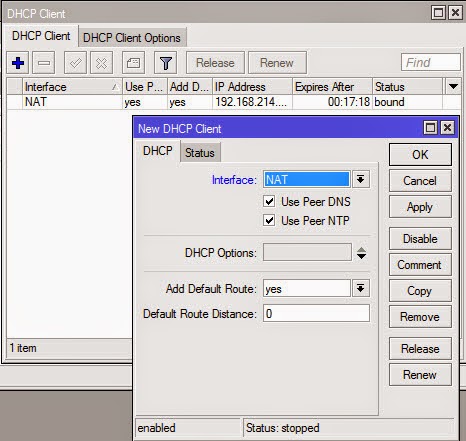
3. Login to Mikrotik via Winbox -> Go to the menu IP
-> DHCP Client -> Add DHCP Client by clicking the
menu +
- Interface: Select the interface connected to the Internet
source
- Use Peer DNS: Check
- Use Peer NTP: Check
- Add Default Route: yes
4. Setting the IP address. Go to the menu IP -> Addresses
-> Add IP address for the interface that leads to the client. Here I
demonstrated to give an IP address on the LAN interface that leads to the
client with the IP address 10.10.10.10/24.
Interface NAT already obtain an IP address automatically as
a DHCP client from internet sources.

5. Add the DNS Server settings. Go to the menu IP -> DNS.
Because in step 5 we already uses the DHCP Client in which column "Use
Peer DNS" is checked, then Mikrotik also has to be the DNS Server
automatically from internet sources.
But to be able to add further reserves its use Google DNS:
8.8.8.8

6. Add the Masquerade NAT settings. Go to the menu IP ->
Firewall -> Login Tab NAT -> Add NAT rule:
~ The General tab
- Chain: srcnat
- Out-interface: select the interface that leads to an
internet source
~ Tab Action
- Action: Masquerade

7. At this point, Mikrotik supposed to connect to the
internet. Check the connection by pinging via terminal.

No comments:
Post a Comment